Table of Contents In Laravel, many-to-many relationships are established using an intermediate table that holds foreign keys from the related
Building a Secure RESTful API with Laravel and Passport A Step-by-Step Guide
- Muhammad Waqas
- May 15, 2023
- 5:07 am
- No Comments
Table of Contents
APIs have become an essential part of modern web development. They provide a seamless connection between applications, allowing them to share data and services. Laravel is a popular PHP web framework that is well-suited for building APIs. It provides a simple and elegant syntax, making it easy to develop RESTful APIs. In this tutorial, we will demonstrate how to build RESTful APIs with Laravel using Laravel Passport for authentication.
Setting Up the Project
The first step in building an API with Laravel is to set up the project. To do this, you need to have PHP and Composer installed on your computer. If you don’t have them, you can download them from their respective websites.
Once you have PHP and Composer installed, you can create a new Laravel project by running the following command:
composer create-project --prefer-dist laravel/laravel api
This will create a new Laravel project in a directory called api.
Setting Up Passport
The next step is to set up Passport for authentication. Passport is a Laravel package that provides a simple way to implement OAuth2 authentication. To install Passport, run the following command:
composer require laravel/passport
After installing Passport, you need to run the following command to set up the migration files:
php artisan passport:install
This command will create the necessary tables for Passport to work.
Defining Routes for the API
To define the routes for the API, we need to create a routes/api.php file. In this file, we can define all the routes that the API will use. Here is an example of how to define a route:
					<?php

use Illuminate\Http\Request;
use Illuminate\Support\Facades\Auth;
use Illuminate\Support\Facades\Route;
use App\Http\Controllers\Api\UserController;

// Register a new user
Route::post('register', 'UserController@register');

// Log in a user
Route::post('login', 'UserController@login');

// Protected routes that require authentication
Route::group(['middleware' => 'auth:api'], function () {
    // Get the authenticated user
    Route::get('user', function (Request $request) {
        return $request->user();
    });

    // Log out the authenticated user
    Route::post('logout', function (Request $request) {
        $request->user()->token()->revoke();
        return response()->json(['message' => 'Successfully logged out']);
    });
});
Creating Controller for the API
Next, we need to create controllers for the API. Controllers are responsible for processing incoming requests and returning responses. To create a new controller, run the following command:
php artisan make:controller UserController --api
This will create a new controller in the app/Http/Controllers directory called UserController. The --api flag tells Laravel to generate a controller with methods that are suitable for building APIs.
Implementing Registration and Login Functionality for the API
Now that we have set up the project and created the necessary components, we can implement registration and login functionality for the API.
Registering a User
To register a new user, we need to create a RegisterRequest class that will be used to validate the incoming request. Here is an example of what the RegisterRequest class should look like:
To create a new request class, run the following command:
php artisan make:request RegisterRequest
This will create a new request class in the app/Http/Requestsdirectory called RegisterRequest.
					<?php

namespace App\Http\Requests;

use Illuminate\Foundation\Http\FormRequest;

class RegisterRequest extends FormRequest
{
    public function rules()
    {
        return [
            'name' => 'required|string|max:255',
            'email' => 'required|email|unique:users|max:255',
            'password' => 'required|string|min:6|confirmed',
        ];
    }

    protected function prepareForValidation()
    {
        $this->merge([
            'password' => bcrypt($this->password),
        ]);
    }
}
In the rules method, we define the validation rules for the incoming request. In this case, we require the name, email, and password fields, and we specify that the email field should be unique in the users table. We also require that the password field be at least six characters long and that the password_confirmation field matches the password field.
In the prepareForValidation method, we hash the password before the validation is performed. This ensures that the password is stored securely in the database.
Next, we need to create a register method in the UserController class to handle the registration of a new user. Here is an example of what the register method should look like:
					<?php

namespace App\Http\Controllers;

use App\Http\Requests\RegisterRequest;
use App\Models\User;

class UserController extends Controller
{
    public function register(RegisterRequest $request)
    {
        $user = User::create($request->validated());

        $token = $user->createToken('authToken')->accessToken;

        return response()->json([
            'user' => $user,
            'access_token' => $token
        ], 201);
    }
}
In this method, we first validate the incoming request using the RegisterRequest class that we created earlier. If the validation passes, we create a new User object with the validated data and save it to the database using the create method. We then create an access token using the createToken method provided by Passport, and return the user object and access token in the response.
Logging In a User
To log in a user, we need to create a LoginRequest class that will be used to validate the incoming request. Here is an example of what the LoginRequest class should look like:
To create a LoginRequest class, run the following command:
php artisan make:request LoginRequest
This will create a new request class in the app/Http/Requestsdirectory called LoginRequest.
					<?php

namespace App\Http\Requests;

use Illuminate\Foundation\Http\FormRequest;

class LoginRequest extends FormRequest
{
    public function rules()
    {
        return [
            'email' => 'required|email',
            'password' => 'required|string',
        ];
    }
}
In this case, we require the email and password fields to be present in the incoming request.
Next, we need to create a login method in the UserController class to handle the login of a user. Here is an example of what the login method should look like:
					<?php

namespace App\Http\Controllers;

use App\Http\Requests\LoginRequest;
use Illuminate\Support\Facades\Auth;

class UserController extends Controller
{
    public function login(LoginRequest $request)
    {
        if (Auth::attempt($request->validated())) {
            $user = Auth::user();
            $token = $user->createToken('authToken')->accessToken;

            return response()->json([
                'user' => $user,
                'access_token' => $token
            ], 200);
        } else {
            return response()->json([
                'error' => 'Unauthorized'
            ], 401);
        }
    }
}
In this method, we first validate the incoming request using the LoginRequest class that we created earlier. If the validation passes, we attempt to log in the user using the attempt method provided by Laravel’s authentication system. If the login is successful, we create an access token and return the user object and access token in the response. If the login fails, we return an error response with a status code of 401.
Testing the API Using Postman
Now that we have implemented registration and login functionality for the API, we can test it using Postman. To test the API, we will send HTTP requests to the API endpoints using Postman.
To get started, we need to make sure that our Laravel application is running. We can start the application by running the following command from the terminal:
php artisan serve
This command starts a local development server that listens on port 8000.
Now, let’s open Postman and create a new request by clicking on the “New” button in the top-left corner of the Postman window. We will use this request to register a new user.
Registering a New User
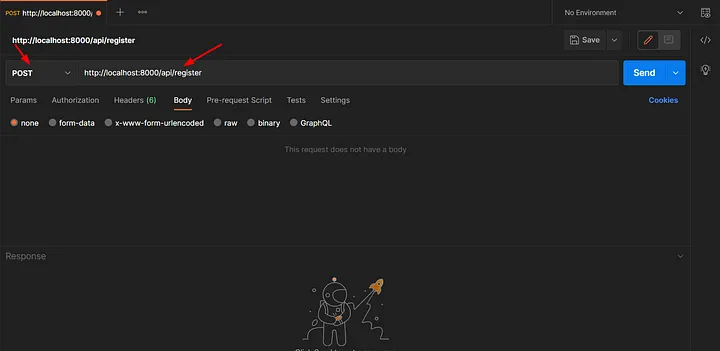
To register a new user, we need to send a POST request to the /api/register endpoint with the user’s name, email, and password in the request body.
In Postman, we can create a new POST request by selecting the POST method from the dropdown list next to the URL input field. We then need to enter the API endpoint URL in the URL input field:
http://localhost:8000/api/register
Next, we need to add the request body. We can do this by selecting the “Body” tab below the URL input field, selecting “raw” as the input type, and choosing “JSON” from the dropdown list. We can then enter the following JSON data in the request body:
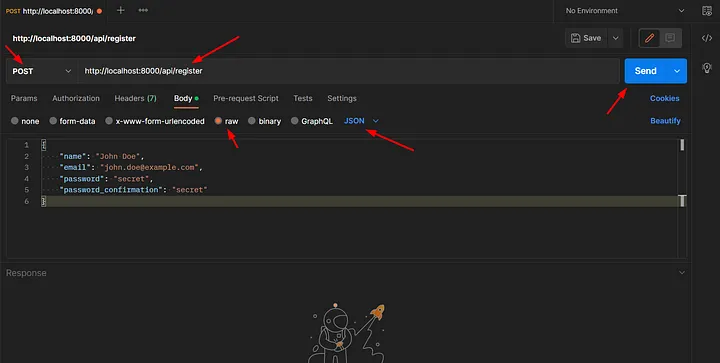
					{
    "name": "John Doe",
    "email": "john.doe@example.com",
    "password": "secret",
    "password_confirmation": "secret"
}
This data represents the user’s name, email, and password.
We can then click on the “Send” button to send the request. If the request is successful, we should receive a response that contains the user object and access token:
					{
    "user": {
        "id": 1,
        "name": "John Doe",
        "email": "john.doe@example.com",
        "email_verified_at": null,
        "created_at": "2023-03-27T09:12:37.000000Z",
        "updated_at": "2023-03-27T09:12:37.000000Z"
    },
    "access_token": "eyJ0eXAiOiJKV1QiLCJhbGciOiJSUzI1NiIsImp0aSI6ImY5YjY5YmY5YjY5NGQwZDRhNGQ1OTI5NTJjMDVmYjg1MTZkN2MzOGM2YmJkNzMwMjhlYzE1YzdlOTNkNDIyNzNlYjY2Y2JmNjg5ODc5ZjMyIn0.eyJhdWQiOiIxIiwianRpIjoiZjl ... "
}
Logging In a User
To log in a user, we need to send a POST request to the /api/login endpoint with the user’s email and password in the request body.
In Postman, we can create a new POST request by selecting the POST method from the dropdown list next to the URL input field. We then need to enter the API endpoint URL in the URL input field:
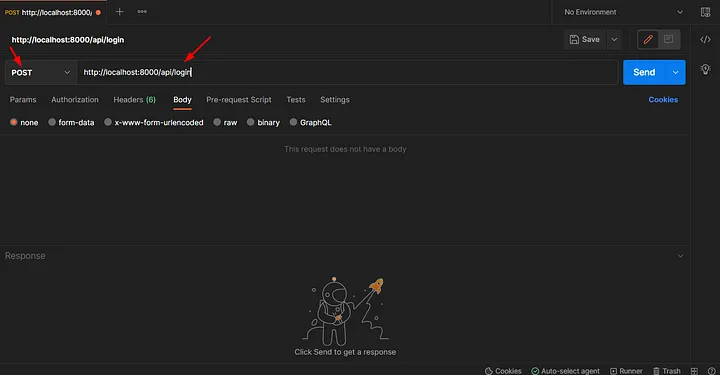
http://localhost:8000/api/login
Next, we need to add the request body. We can do this by selecting the “Body” tab below the URL input field, selecting “raw” as the input type, and choosing “JSON” from the dropdown list. We can then enter the following JSON data in the request body:
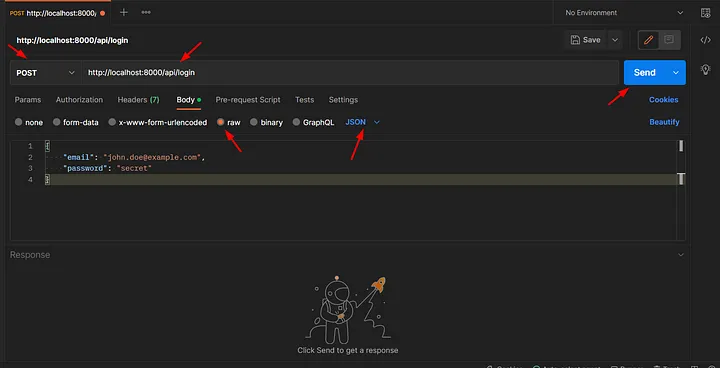
					{
    "email": "john.doe@example.com",
    "password": "secret"
}
This data represents the user’s email and password.
We can then click on the “Send” button to send the request. If the request is successful, we should receive a response that contains the user object and access token:
					{
    "user": {
        "id": 1,
        "name": "John Doe",
        "email": "john.doe@example.com",
        "email_verified_at": null,
        "created_at": "2023-03-27T09:12:37.000000Z",
        "updated_at": "2023-03-27T09:12:37.000000Z"
    },
    "access_token": "eyJ0eXAiOiJKV1QiLCJhbGciOiJSUzI1NiIsImp0aSI6ImY5YjY5YmY5YjY5NGQwZDRhNGQ1OTI5NTJjMDVmYjg1MTZkN2MzOGM2YmJkNzMwMjhlYzE1YzdlOTNkNDIyNzNlYjY2Y2JmNjg5ODc5ZjMyIn0.eyJhdWQiOiIxIiwianRpIjoiZjl ... "
}
Accessing Protected Routes
Now that we have registered and logged in a user, we can access the protected API endpoints by including the access token in the request header. We can do this by adding a new header to the request with the key Authorization and the value Bearer <access_token>.
For example, to access the /api/user endpoint, we can create a new GET request in Postman, enter the following API endpoint URL in the URL input field:
http://localhost:8000/api/user
Then, we need to add the authorization header to the request. We can do this by selecting the “Headers” tab below the URL input field and adding a new header with the key Authorization and the value Bearer <access_token>, where <access_token> is the access token we received when we logged in the user.
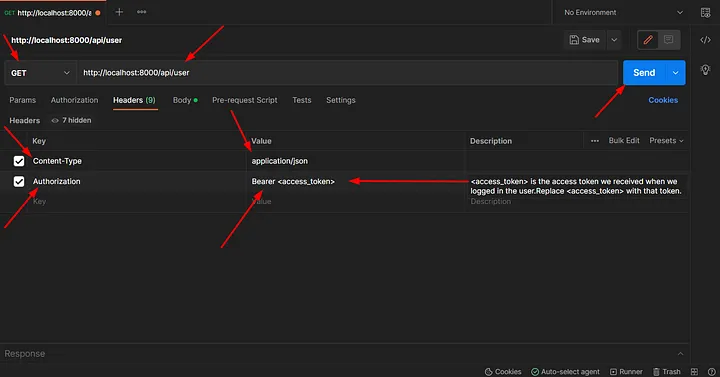
We can then click on the “Send” button to send the request. If the request is successful, we should receive a response that contains the user object:
					{
    "id": 1,
    "name": "John Doe",
    "email": "john.doe@example.com",
    "email_verified_at": null,
    "created_at": "2023-03-27T09:12:37.000000Z",
    "updated_at": "2023-03-27T09:12:37.000000Z"
}
This shows that we have successfully accessed the protected API endpoint using the access token.
We can also test the /api/logout endpoint by sending a POST request with the access token in the request header. To do this, we can create a new POST request in Postman, enter the following API endpoint URL in the URL input field:
http://localhost:8000/api/logout
Then, we need to add the authorization header to the request. We can do this by selecting the “Headers” tab below the URL input field and adding a new header with the key Authorization and the value Bearer <access_token>, where <access_token> is the access token we received when we logged in the user.
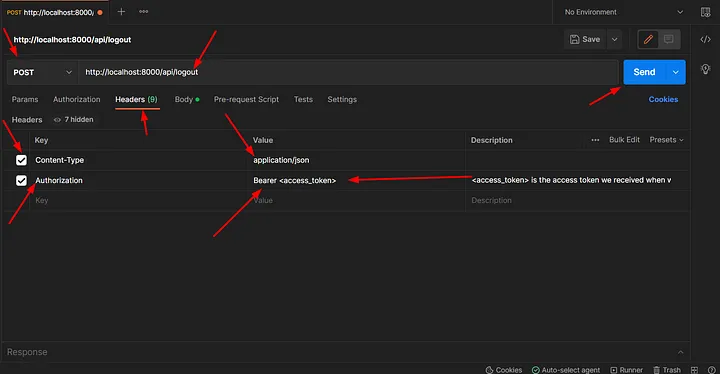
We can then click on the “Send” button to send the request. If the request is successful, we should receive a response that contains a message indicating that the user has been logged out:
					{
    "message": "Logged out successfully"
}
Conclusion
In this blog post, we have seen how to build RESTful APIs with Laravel using Laravel Passport for authentication. We have gone through the process of setting up a new Laravel project, installing and configuring Laravel Passport, defining routes, creating controllers and models, and implementing registration, login, and logout functionality for the API.
We have also seen how to test the API using Postman by sending HTTP requests to the API endpoints and verifying the responses.
Laravel Passport is a powerful tool for building secure and scalable API authentication systems. With its intuitive API and robust feature set, it can help developers build complex API authentication systems with ease.
Popular Post
Table of Contents Introduction: Laravel is a PHP framework that has become quite popular in recent years. One of the
Table of Contents In Laravel, models are the backbone of the application. They act as a bridge between the database
Table of Contents Laravel is a popular PHP framework that is widely used for web application development. One of the

An experienced Code Debugger with a strong track record of identifying and resolving complex software issues. I aim to contribute my analytical skills and expertise in debugging tools to ensure efficient and reliable software operations and deliver high-quality software products that meet customer requirements.
If you found this content valuable, please show your support by following me on Medium, LinkedIn, Twitter and GitHub. Your support will motivate me to create more informative content in the future. Don’t forget to give a clap or share this blog with others if you found it helpful!
